Moving WordPress (2) – AWS setup
This is the second part of my writeup of everything I did to move my site from one EC2 instance to another, and make a bunch of other changes. It’s mostly documentation for myself, so it is rough and may at times not make complete sense, though I hope anybody else who tries something similar finds it useful:
Moving WordPress (1) – what I wanted to do
Moving WordPress (2) – AWS setup
Moving WordPress (3) – database and content
Moving WordPress (4) – SSL, themes, etc.
The AWS setup was the easy part. That should have been no surprise, as I’ve spent lots of time with AWS but very little time ever managing a WordPress site. The data migration described in part 3 was the really annoying bit, and while the quirks of AWS tools certainly didn’t help there, the issues were mostly WordPress things.
VPC setup
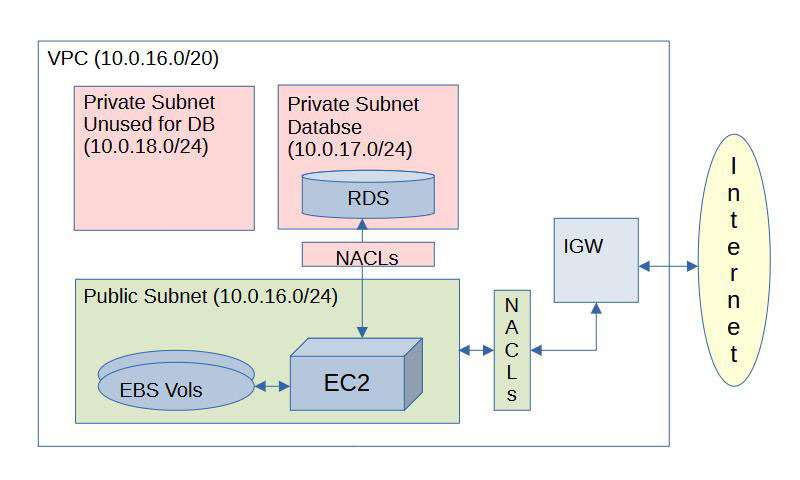
I decided to create an entirely new VPC, use VPC peering for the data transfers, then create a new EC2 instance, a new RDS instance, and all the various bits of VPC setup (internet gateway, access control lists, etc.) that are required. The new VPC is a /20 (i.e. it contains 4096 IP addresses) , and I have set up only three subnets, each a /24 (i.e. each contains 256 IP addresses), so there is IP space left for 13 more subnets of the same size or many, many smaller ones, should I ever need create them.
Ordinarily, I use smaller, more appropriately sized subnets, all in a smaller and more appropriately sized VPC. There is no way in hell I will ever need 256 addresses per subnet, and 16 subnets just to run a WordPress site. I could have chosen /28 (16 IP addresses per subnet) subnets in a /24 VPC and it would still have been overkill*. This is important if you’re creating many VPCs and may want to peer them at some point. You can’t peer VPCs with overlapping IP space so keeping them small and allowing for overlap can really matter in enterprise situations with dozens or hundreds of VPCs. But this use case is simple, and I’m unlikely to ever create enough VPCs and subnets in my personal account for that to become an issue. 10.0.16.x and 10.0.17.x are easy to setup, easy to remember and easy to quickly identify.
[* Yes I know, AWS reserves 5 IP addresses in every subnet, so a /24 is really only 251 usable, /28 is really just 11, etc.]
Route tables
Routing is simple. The public subnet has a route to the internet by way of the Internet Gateway. The database subnet does not so it can only be accessed from inside the VPC. For my purposes, no other routing is required.
NACLs
The public subnet’s Network Access Control List (NACL) allows inbound traffic from the internet gateway on ports 80/443 (http/s) for people accessing the sites, inbound traffic in on port 22 (SSH) so I can manage the thing, and responses to both via ephemeral ports (1024-65535). Finally, it allows outbound traffic to the DB subnet on port 3306 (MariaDB/MySQL) with inbound responses from the DB allowed on ephemeral ports.
I later realized that these allowances were not sufficient. The WordPress application needs to be able to make http/s requests for updates, to download new themes, plugins, etc. When I discovered this I opened up outbound permissions to the public internet on ports 80/443 and inbound responses on ephemeral ports. There are a lot of things I could do to make it even more secure, but all of them are overkill and increasingly pricey for my use case.
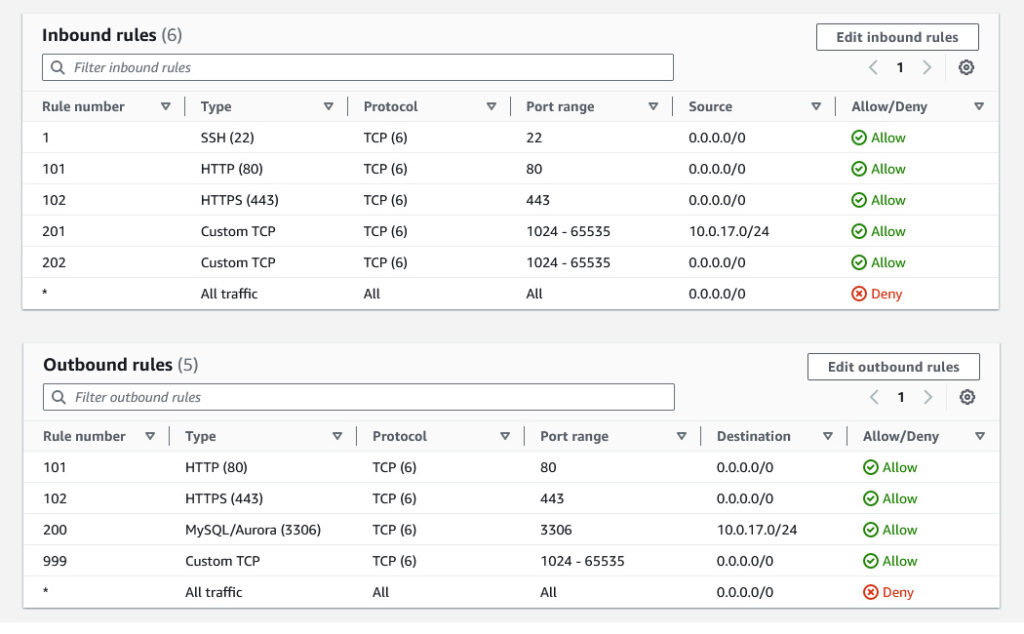
The DB subnet has settings that mirror the allowances on the public subnet: inbound traffic to the database is allowed on port 3306, outbound traffic allowed on ephemeral ports. Nothing else is required.
Security groups
Additional security is provided by the Security Group for the EC2 instance. It’s an example of how the stateless nature of NACLs can mesh well with the stateful nature of Security Groups. The stateless nature of the NACL allows inbound traffic on ephemeral ports, while the stateful Security Group only allows ephemeral port responses to requests an allowed port. The combination of the two allows the most granular possible control of what can get in and out.
The database instance has it’s own security group, allowing inbound traffic on port 3306.
RDS database setup
Setting up the RDS instance was painless. I went for the smallest possible instance (db.t4g.micro) and attached 20MB of gp3 storage. It can autoscale up to 60MB and that will be enough for a lifetime. A big factor in my database utilization has been updates/revisions to my posts. I tend to write a bit at a time saving drafts as I go, then eventually make it public. WordPress keeps a copy of every revision by default, so most of my posts had dozens of copies stored. In the new setup I’ve limited it to the 3 most recent revisions. I have comments turned off, so 20MB for my text will last a long time.
The quirk I had forgotten when I set things up is that RDS requires a database subnet group, and it must contain at least two subnets in at least two AZs. I believe this is to avoid locking you out of upgrading to multi-AZ in the future, as the subnet and group for an RDS instance can’t change once it is created. I had to add the 10.0.18.0/24 subnet, then walled it off from all traffic with NACLs, and included it in the required subnet group. It doesn’t do anything other than consume a bunch of IP addresses, but I guess if I ever need to go multi-AZ, it’s there.
I attempted to use the latest and greatest ECC384 certificate for TLS authentication. WordPress did not like this, so I switched to the RSA4096 cert. It’s all internal and pretty well protected, but I prefer to encrypt everything even if it’s not leaving my VPC. The certificate will last until May 2121, and after that IBGYBG.
EC2 instance setup
The web server is a t4g.micro. I decided to switch to the new (Graviton) ARM-based instance family. ARM is now familiar ground and I am not wary of using it for anything that can run on it. I’ve been using ARM-based solutions more and more, including on my home NAS and on the Raspberry Pis that have become an important part of my personal tech playground.
I’ve set up two EBS volumes. One is /root, containing all the normal Linux stuff, applications, etc. I don’t expect that this one will change often and I’ll snapshot it when it does. I’ll periodically log in and run “sudo dnf update” to keep the EC2 instance current and snap it if something meaninful changes. In real life you should automate this. The second volume is mounted to /html and contains everything for the three websites I’m currently running. I’ve decided to keep things simple by running three standalone WordPress installations rather than mucking around with multi-site WordPress. Again, possibly not a best-practice if you’re running a lot of sites, but in my case, where I fully expect one of the sites to disappear in the next year or two, it’s a reasonable and simple approach.
That second volume will be snapped on Tuesdays, Thursdays and Saturdays (RIP Jimmy). This is not a best practice for backup, and in fact snapshots are a terrible idea for backup in most production uses. But updates to my sites will occur at most a few times a week, and for a personal site, I’m willing to risk loss of a single post sometime between now and the heat death of the universe, compared to the cost of a much more comprehensive backup strategy.
Warning! Setup details ahead!
Storage and housekeeping
Below, text in orange is the AWS recommendation. The commands I actually used are in black/grey. I’ll explain below where I deviated. Someday I’ll get used to “dnf” replacing “yum”.
First things first:
sudo dnf update -yI usually start by installing my most used thing:
sudo dnf install emacsIf you like vi, I can’t help you.
Next, mount the /html Volume:
I created the volume at the same time as I created the instance, so it’s already attached. If it’s created separately, you’ll have to attach it before the next command works.
Get the name (in my case, “nvme1”) for the device. The name displayed when you issue the lsblk command is different from what the same volume is called in the console. Do not use the naming convention from the console (“sdX”). Ask me how I know.
sudo lsblk -fNow, make some partitions. Well, one partition. You could make more, but no need in this application. I won’t dive into too many details as you can look up how to use parted to make partitions. The following commands first make a partition table, then create a partition using 100% of the available space.
sudo parted /dev/nvme1n1 mklabel gptsudo parted -a optimal /dev/nvme1n1 mkpart html 0% 100%Make a file system on the device. The lsblk command will reveal the name of the partition. If you are creating only one, it is likely to be <name of device>p1. Then use this command with the correct partition name to make a file system:
sudo mkfs.ext4 /dev/nvme1n1p1Issuing the lsblk command again will reveal the UUID for the new formatted partition with the filesystem on it. Copy the UUID and insert the following line into /etc/fstab to mount it automatically when the instance boots:
UUID=<UUID from the above command> /var/www/html ext4 defaults,nofail 0 2I won’t get into the details of /etc/fstab here. It’s easy enough to look it up.
Reboot. Run the lsblk command again and the volume should now show the correct mount point. If not, you probably mistyped something in /etc/fstab, or you did what I did the first time and forgot to hit ^X^S before exiting (or whatever it is they use to save the file in vi).
Take a break, have a beer. The basic setup of the instance is complete.
LA(M)P stack setup
Amazon Linux 2023 is different from the older Amazon Linux 2 that I had used previously. Many of the instructions I had for setting up the stack from my previous efforts no longer work, so I’ve taken notes and will repeat them here. The instructions on the AWS site are surprisingly good, but I needed to do some additional research to ensure I had all the packages WordPress requires.
The high level instructions for installing WordPress on AL2023 are linked here.
The instructions for installing LAMP on AL2023 are here.
The AWS instructions for the LAMP stack recommend:
sudo dnf install -y httpd wget php-fpm php-mysqli php-json php php-develI deviated from this, mostly because the php package names in the AWS doc seem to be obsolete, and instead I used the ones I found in the list of supported rpm packages that AWS is nice enough to list on their website. I also installed php-gd, which is required by some of my photo-related plugins. I also elected not to install “the “mariadb105-server”, because I’ll be running the database server on RDS, I only need the client.
sudo dnf install httpdsudo dnf install wgetsudo dnf install mariadb105sudo dnf install -y php8.2 php8.2-fpm php8.2-gd php8.2-mysqlnd php8.2-develAfter all that, start it up and make sure it stays that way through a reboot:
sudo systemctl start httpdsudo systemctl enable httpdSetting the file permissions correctly is well explained in the AWS documentation I linked above, so I won’t get into too many details, but the commands are:
sudo usermod -a -G apache ec2-userLog out then back in to pick up the new groups. Adjust the above command if you’ve decided to have your username be something other than the standard “ec2-user”.
Change file ownership and write permissions. I did this again after I copied a whole bunch of files from my old EC2 instance using scp.
sudo chown -R ec2-user:apache /var/wwwsudo chmod 2775 /var/www && find /var/www -type d -exec sudo chmod 2775 {} \;find /var/www -type f -exec sudo chmod 0664 {} \;With both Apache and PHP installed and running, both the Apache empty site page, and the phpinfo.php page should now work, with all the right details displayed.
The AWS documentation says this is the time to set up TLS authentication. That doesn’t really make sense before there is a website hosted here, so I passed on the full certbot setup and will document that bit after WordPress is installed and the sites are working. But I did install SSL support for Apache:
sudo yum install -y mod_sslThat’s the entire LAMP stack including SSL support.
Time to take another break, have another beer.
Next step is installing WordPress and migrating the site(s), in part 3, then finalizing everything and getting SSL running in part 4.